Sunday, October 24, 2010

Making it Monday: Caramel Apple Cider and Pumpkin Seeds Recipes

I love fall for so many reasons, the change of season is exhilarating and brings such a richness of color and also flavor as we add soups, and spices to so many things. Here are two favorites that I thought you all might enjoy.

Starbucks has a Carmel Apple Cider to sip and enjoy. It is pure indulgence. I love this and have enjoyed getting one for years. I say one because first off they are pricey and second off they are made with whip cream and caramel so the calorie count is high. Well I found this recipe a few weeks ago on the Roots and Wings Website...if you haven't checked out their blog it has so many wonderful ideas. I have had one almost every day since. So here it is try it and see what you think.

Recipe:
A glass of apple juice or cider
Mix in 1 to 1 1/2 tsp of Cinnamon Syrup (You can buy this at Starbucks...I also heard you can get it in sugar free version it cost about $8 for a large container)

Heat in the microwave until hot.

Serve with Fat Free Whip Cream...drizzled with sugar free caramel. The caloric count ends up being about 130 calories for 8 oz. Depending on how much caramel you use.

So yummy.

Second...we love roasted pumpkin seeds.

Here are two versions we tried today.

Pumpkin Seeds

Separate the seeds from the pumpkin and rinse off.
Soak seeds in water saturated with salt overnight.
Drain water from seeds and pat dry.
Put seeds on cookies sheet lined with Silpat
Roast plain or drizzle with olive oil and seasonings (such as season all, or cinnamon, sugar and dash of nutmeg)
Bake in 350 degree oven for 30-45 minutes until toasty brown.
Let cool and enjoy.

We tried the plain and the cinnamon and sugar this year and both were delicious.

Hope you are enjoying this wonderful Autumn time of year.

Thursday, October 21, 2010

Review Thursday: Beezus and Ramona Movie

I grew up reading the Ramona books and loved them. I have started reading them to Mini B at night and although they are still a bit old for her she has enjoyed the funny stories and it has been fun for us to read them. I was thrilled and also a bit leery when I saw that they were making a movie out of something I loved as a child. So many spin offs from books I love tend to be either too cheesy or off the wall.

I have to say I would give this movie five stars...
I loved it. It was sweet and happy. Mini B loved it and we both laughed through it. I cried several times and have since watching it have taken extra care as I speak to my little ones. I thought they weaved in many favorite story lines from many of the books so that it felt fresh and not forced.

I liked it so much I am asking for it for Christmas. I loved this movie and would recommend it to everyone. If you saw it I would love to know what you think.

Saturday, October 9, 2010

Madeline Theme and a Bon Anniversaries Party

So my little Mini Boden is having a birthday. She decided on the Madeline theme for our cake and ice cream family get together. She also told me what she wanted for decorations. I did my best to make it happen. Here is the party table. The tissue pom, pom's were super easy and the tutorial is on here from Martha Stewart We colored a picture of Madeline we found on the computer and put it in a frame. The french flags came from a party store, as well as the french flag picks for the cupcakes.

The yellow hat cake was fun and fairly easy to make. Instructions are located here at Family Fun.

The entire party table.


I made the banner using white binding off a roll that I picked up in the craft section at Walmart. I stapled red satin ribbon to the top and circle fabric cut outs. The letters I made on my computer and just cut them out.


My son Thing 1 made this Eiffel Tower picture as a decoration for his sister. I love it.


Here is my favorite part. Mini B, wanted a shirt that looked like Madeline's cape with a yellow Eiffel tower on it. We picked up a blue shirt 50% off at Hobby Lobby. For $1.50. I used some of the white quilt binding from the banner and cut it into two pieces. I sewed it on to the neck with my sewing machine. Then we tied the ribbon in a bow and stitched it on as well. I found an Eiffel tower coloring page and cut out a template and used it on some yellow fabric. I appliqued it on with a blanket stitch. It was so fun for her to have this fun shirt for her party. Especially since she designed it.


We cut out pieces of foam core we picked up at the dollar store and two easels. Then Mini B. Painted pictures on them. She also colored a picture of Miss Clavel and twelve little girls from the Madeline book. We put this in a picture frame on display.


We had a great party and had so much fun putting this party together. It was fun, unique and we had a great time together.


Wednesday, October 6, 2010

Halloween Decorating on a REAL Budget

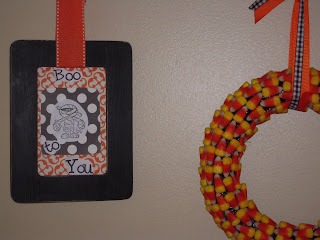
I love decorating especially for the holidays. I have a small decorating budget...like almost nothing. So I have to get creative. Since the homestead is also small, I have a space budget too. One thing I have done to add holiday cheer is to switch out the ribbons and pictures in my front entry way. Here is our new Halloween decor. The wreath is made from a $1 foam wreath I picked up at the Dollar Store, I wrapped it with black duct tape, then hot glued the candy corn to it. It took about an hour while my hubby and I watched a movie. I found the idea here at Woman's Day magazine. For the pictures I took a piece of orange scrap book paper taped a piece of black and white scrap book paper to the orange. I bought two Halloween stamps for $1 each at Michael's I stamped white paper and printed out some sayings from my computer...I don't have a Silhouette so I have to use what I have. Then I just taped them all together and hung them with ribbon.


I love my wreath. I picked it up at Michael's on clearance it was a nautical themed wreath with shells, a wooden sign and and anchor for $5. I took everything off and then used the wreath for our Halloween stuff. The sign in the center I picked up at Walmart for $1 a few years ago. We wrapped it in fake spider webs and put spider rings all over it, then added a giant spider from Tai Pan which was $2 and that was it. Over the years it has picked up dried leaves which just add to the spooky look. The basket on our house we filled with mini pumpkins from a local pumpkin patch.


This isn't a very good picture, they actually look much cuter than they do here. I have three trees that I have to keep on my porch because I don't have room to store them. So I try to decorate them for the holidays. I put orange lights on them, that I had, and little witches buckets that we have collected from Halloween parties.


Our mantel has been fun. Another scrapbook paper and computer print off for the center picture. The skull, crow and headstone are from the $1 store. The pumpkin tree I picked up for .15 cents at a going out of business sale. The boxes say witches, cats and pumpkin seeds and are just painted black.


My favorite part of our mantel is the banner that Thing 1 made for Halloween. I think he did a great job.


I saw this idea here at the Crafting Chicks blog...I took it to a more simple level. I picked up some black card stock, used metallic white paint for our hand prints and white crayons to list the name and year. I think we are going to do this every year and see how our hands have grown. It was so much fun.


I wanted to add something to our downstairs area, so I made a banner. I traced a circle with a vase on the scrapbook paper from our entry way. I used 2 pieces total for all the projects. Then stamped a haunted house and mummy on white paper and printed off the words Trick or Treat on my computer. I stapled the circles on black gross grain ribbon from the Dollar Store.


Here is the banner up close.


I wanted to add my pumpkins that I bought 3 for $1 at the pumpkin patch so I found a vase in my basement, filled it 1/4 full with black and white beans that I had, put in three pumpkins added some black ribbon and a Happy Halloween sign, with scraps of paper and from my computer. I thought it would be fun to trade out pictures of my kids with ones of them in their costumes from last year. They loved it and it made a fun and inexpensive Halloween addition.


So for all my new decor I spent $1.20 on scrapbook paper, $1.00 in ribbon, $3.00 in pumpkins and two stamps $2.00. Not bad for $7.20. Hope you found some ideas to use. Happy Haunting.
Em